Design Your Own Website From Scratch
Okay, let's build a website.
No coding, no jargon. Just straightforward advice on building an eye-catching website from scratch without necessarily having much coding skills .
Creating your own website might feel like a daunting task, but it's easier than you think. You certainly don't need to spend thousands on a developer or designer.
Of course there are many different ways to go about this task, but for now we'll just cover one of them to hit all the instructions in detail. If you follow a simple, step-by-step process, you can be up-and-running in less than an hour.
Before we get started, there are a few terms we need to understand. We'll be using them a lot.
- Web host - Think of building your website like building a house. Before you build, you've got to buy a plot of land. A web host is the plot of land where you'll build the website.
- Domain name - This is the address of your website: www.your-website.com.
- WordPress - WordPress is a website-builder we'll focus on for this tutorial. It's the software that lets you choose a design and keep your website updated. There are other options out there, like Wix, or Tumblr if you just want a very basic blog, but Wordpress is widely used and reliable, with plenty of options for customization.
Step 1: Set up Your Web Host
There are hundreds of web hosts out there to choose from, but some are better than others. Remember, this is the foundation of your website. You're looking for something strong and reliable.
A good web host is also essential for speed. No one wants a slow website, and speed begins with your host.
If you're just starting out, you have two real options. First, you can take what WordPress will give you for free, but this will limit you in a few ways—your website's address will be at youraddress.wordpress.com (unless you pay to upgrade) and you won't have access to some other advanced features. If you don't mind that, create an account at WordPress.com and skip to Step 4.
Otherwise, you'll want something affordable and powerful for your web host. I use Inmotion Hosting , so I'll use that to demonstrate the next few steps.
All web hosts come with different plans, but you can safely choose the cheapest, entry level package.
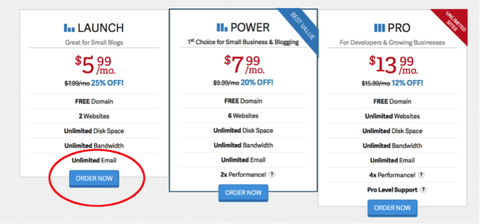
Step 2: Pick a Domain Name
Now comes the fun part - choosing an address for your website.
www.your-new-website.com
Almost all web hosts come with a free domain (though you may have to pay extra more for a popular one).
Once you're logged into your web host account, click on domains and then register new domains.

There will be a similar set up no matter which web host you're using.
Here, you can search for your chosen domain name and see if it's available. If it is, it's all yours!

Congrats, you now have a plot of land and an address. Next up, building the website.
Step 3: Install WordPress
Now we're going to install our website-builder, WordPress .
WordPress is the software you'll use to design your site, upload content, and keep everything running smoothly.
All web hosts have a simple way to install WordPress. In our case, you click on install popular software which you'll find on the main dashboard.
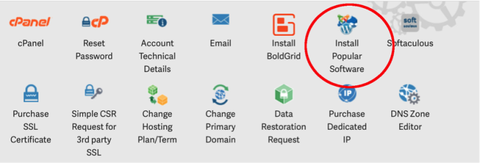
And then install WordPress...
You'll be prompted to create a WordPress login and password, then you're good to go!
You now have a web host, domain name and WordPress installed on your site. Next step, making it look eye-catching.
With your new credentials, login to WordPress and let's get creative.
Step 4: Choose a "Theme"
A WordPress "theme" is a basic template or design for your website. There are hundreds of free options to get started, so you can try them out and find the right look for your site.
Start by navigating to Appearance > Themes > Add new theme.
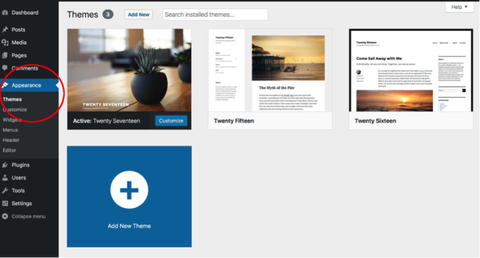
Here you can browse through lots of free templates or choose to display the latest and popular themes.
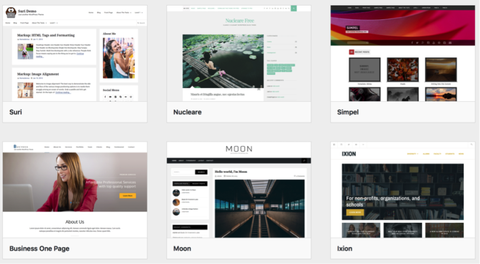
Try using the "feature filter" button too. Here you can choose to show themes in different categories, such as "blog," " e-commerce ," "portfolio" or "news." These options are great if you have a particular type of website in mind already.
With each of these free themes, you can activate them on your website straight away, so you can test them out and see how they look.
Optional Step 4.5: Try a Premium Paid Theme
If you're looking for something a bit more unique or a theme with more features, you could purchase a premium theme. They range from $20 to $60 and you can buy them through WordPress or via marketplaces like Theme Forest .
Step 5: Customize Your New Site
Once you've chosen and installed a basic theme, you can tweak and customize it to your liking. This is where you can get creative.
Back on your themes page, click customize.
This is where you can add images, change the color scheme and add titles. It's where you turn a basic skeleton template into a website with your own style.
Click on the little pencil buttons to edit, and you can tweak the title, subtitle and menu bar.
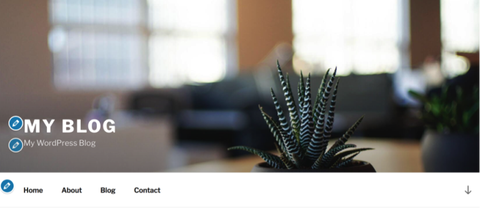
You can also change the header picture to something more personal and unique. Perhaps you already have a logo in mind for your business or website.
Step 6: Always use Professional, High-Quality Images
If you want an eye-catching website, the images you choose are crucial. It's often the first thing your visitor sees, and it has to make an impact. Always use high-quality images and be sure to upload a sufficiently high resolution to keep it looking sharp.
Step 7: Add New Pages
With your homepage looking slick, it's time to add a few more pages. You probably want an 'about page', a 'contact page' and other elements for your site.
Click 'pages' and then 'add new' to create your first page. Here's how it looks when you create a 'contact' page.

Click on the 'edit' button and you can start adding pictures and text to your new contact page. As you can see, I've uploaded a picture of an office and changed the text. There's no coding, it's all drag and drop.
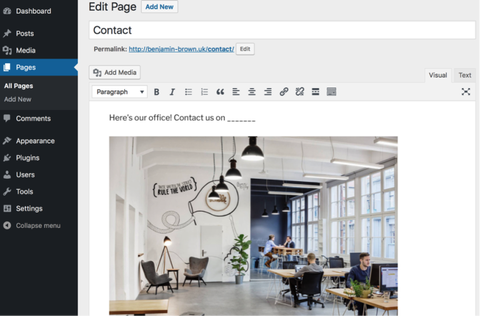
Hit the 'publish' button and it goes live on your new website.
Step 8: Add Blog Posts to Your Website
The last step to making it look great is adding some content. WordPress originally started as a blogging platform, so you'll find it super easy to add blogs and content to your site.
All you have to do is click "Posts" and then "add new." Now you can create a blog post by adding text and images. Simple!

Step 9: Keep Experimenting!
Congratulations, you've now got a website up and running. You've got a theme, you've added new pages and uploaded some beautiful images.
But this is just the start. From here, you can keep experimenting. Try out new themes until you're happy with the look and feel of your site. Upload new images and keep the website updated with fresh new content.
There are always new updates to install and new features to try out. Keep an eye on popular web design blogs to see the latest trends. Most website owners will tell you they never stop tweaking and changing!
Try it for yourself. It's easier than you think, and you could be online by the end of the day. Good luck!
This content is created and maintained by a third party, and imported onto this page to help users provide their email addresses. You may be able to find more information about this and similar content at piano.io
Design Your Own Website From Scratch
Source: https://www.popularmechanics.com/technology/how-to/a25995/how-to-create-a-website-from-scratch/
Posted by: williamssignitere.blogspot.com

0 Response to "Design Your Own Website From Scratch"
Post a Comment