

Photoshop Elements 10 Tutorial For Beginners
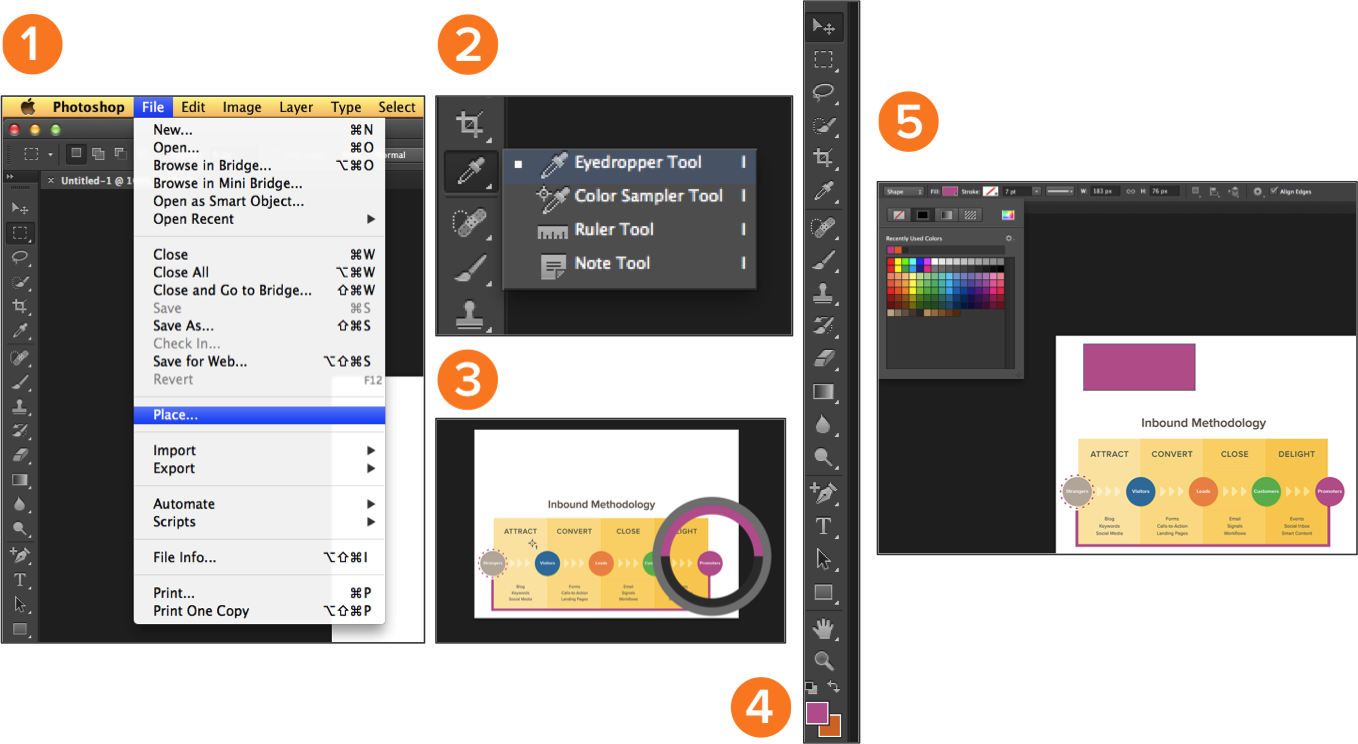
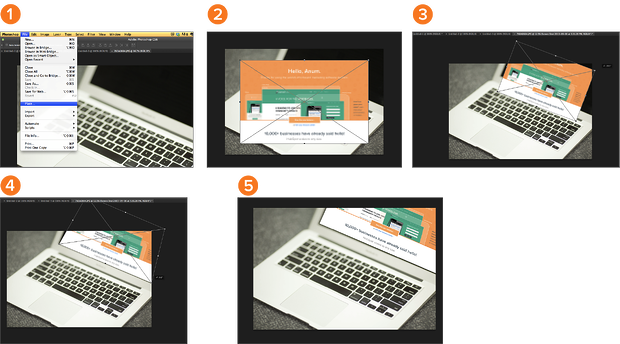
Hi. My name is Anum Hussain, and I am not a professional designer. But ... I've "designed" the majority of our marketing ebooks. I've "designed" endless PowerPoint presentations. I've "designed" CTAs, socialimages, infographics, blog images. You name it, I've done it. But I am not a designer. I am, however, a marketer. And today's marketers better be ready to acquire new skills -- whether that's coding, analyzing, or designing. Modern marketers wear multiple hats, and a frequent hat that appears (often, the best looking hat of them all) is the designer's hat. Over the past two years, I've acquired enough Photoshop knowledge to design what I need to do my job. This post will dive into three of the tricks I've picked up to do some basic design work. While you can learn more about how to use Photoshop here, this post will share some beginner tips to start designing for your marketing today. How painful is it when you want to quickly craft an image for a blog post, or add a component to another image for an email, but you don't have the right colors that your brand uses memorized? Unless you're on a professional design team, you likely have no idea what the RGB for each brand color is. That's where the eyedropper tool can save your life. Let's walk through how to use it. I'll display an image with all the steps first, and walk through each step in the process below. 1) First things first, if you're looking to add brand colors to your color palette for image creation, you'll need to place a brand image in Photoshop to grab the colors from. Unlike the Microsoft suite where you "insert" an image, in Photoshop you "place" an image by going to File >> Place. With that tool selected, click on the part of your placed brand image that contains the color you're looking for. 2) Be sure you see the color get picked up. You'll see the tool make a circle indicating that the color has been scooped up by the eyedropper. 3) If you've been successful, the color should now appear as one of the core colors in your toolbar. I suggest clicking on the little double-sided arrow above it a few times. This helps Photoshop pick up the color in its own "mind." 4) Try building a shape or typing text -- anything basic. You'll notice that when you go to change the color, you can now see the color you picked up earlier as an option in recent colors. To further visualize this concept, check out this brief Instagram video (note: your speakers aren't broken, there's no sound): Now let's say you want to stylize a background or component of an image. While you can go crazy painting away in an old tool like Paint ... you could advance your skills by using the paintbrush tool in Photoshop in conjunction with the shift key. Let's dive into how this looks. 1) First you'll need to select the brush tool from your toolbar. This will give you the right brush you need. Feel free to change which color you'd like to use by following the same color instructions mentioned in the first trick. 2) Across the top of your Photoshop screen, you should see a little option that opens the "Brush Preset Picker." This is just a fancy word for which type of digital paint brush you'll be using. Select a few different types to play and test which ones you like and which will work for you. 3) To have a clean and crisp look, hold down the shift key as you use your mouse to click and draw your line. Holding down the shift key will ensure the line drawn is straight. From there, you just have to play with which brush type and size you use from step two. To further visualize this concept, check out this brief Instagram video (note: your speakers aren't broken, there's no sound): Often, it's useful to transform an already quality photo to personalize it for your own marketing needs. That's why we offered 75 free stock photos recently for you to download and use. One of them is even used in the example below where I'll show you how to transform a screenshot to customize an image. I've used this trick multiple times, most frequently with book images on which I overlay screenshots of a PDF to make a 3D looking image, like this one for our introductory Pinterest ebook. Here's how you do it: 1) First, open the image you want to customize. This is as simple as File >> Open. 2) Next, select the image you want to overlay. In this case I took a screenshot of HubSpot.com. 3) By clicking Edit >> Free Transform, you can customize your image in a variety of ways. Start by first rotating the image in the correct direction. Simply go to a corner of the image to see the curvy arrow appear to move the image around. 4) Here's the cool part. Go to any of the four corners of the image, hold down the Command (if you're on PC, Control) key. As you hold it down, use your mouse to click on that corner and start adjusting the image to fit the setup of the core image you're customizing. You'll notice the image begin to transform in any which way you pull it! 5) Make sure you adjust every corner (even if it's off screen/canvas) to ensure the image dimensions look normal and clean. Your image is now customized! To further visualize this concept, check out this brief Instagram video (note: your speakers aren't broken, there's no sound): And there you have it, folks. Three super suave tips to help you design some basic graphics in Photoshop. If you have more tricks of your own, feel free to share in the comments for all us "designers" of the marketing world! 
Use the Right Color Every Time
Easily Construct Straight, Stylish Lines or Backgrounds

Transform Screenshots to Customize Various Images

Originally published Sep 9, 2013 4:38:00 PM, updated July 28 2017
Photoshop Elements 10 Tutorial For Beginners
Source: https://blog.hubspot.com/marketing/get-started-with-photoshop-ht
Posted by: williamssignitere.blogspot.com
0 Response to "Photoshop Elements 10 Tutorial For Beginners"
Post a Comment